Thursday, June 30, 2016

Patriotic Recipes to Celebrate the 4th of July

No Independence Day is complete without a few red, white, and blue treats! Celebrate America’s birthday with some of the patriotic recipes below. They’re all easy to make and will make your partygoers ooh and ahh almost as much as they will over the fireworks!

http://www.teambeachbody.com/teambeachbodyblog/nutrition/patriotic-recipes-to-celebrate-the-4th-of-july?referringRepId=28870

Independence Day Fruit Tray
No recipe needed for this one! It can be as big or as small as fits your gathering. Take your favorite red fruits and use those, along with blueberries and banana, to create the American flag! We picked cherries and raspberries for the version below, but you can use watermelon, strawberries, grapes, or even goji berries if you’re feeling super fancy.
Independence Day Fruit Tray

Cashew and Oat Hotcakes
Kick off the 4th of July with this healthy pancake recipe that is 21 Day Fix friendly and full of fiber! Get the recipe.
Cashew and Oat Hotcakes

Red, White, Blue Parfaits
This mini parfait pudding is one great way to celebrate the red, white, and blue and get your healthy nutrients at the same time! Get the recipe.
Red White Blue Shakeology Pudding

Peanut Butter Banana and Berry Toast
Here’s a cute breakfast or snack idea! Take a piece of whole-grain toast, spread your favorite nut butter on top, and add some berries to create a flag. Get the recipe.
Peanut Butter Berry Banana Toast

Star Spangled Salad
This salad is so easy to make — simply cut watermelon into stars with a cookie cutter and toss in some blueberries — but partygoers will love its holiday spirit. Get the recipe.
Star Spangled Salad

Berryworks Shakeology
You know it wouldn’t be a holiday at Beachbody without Shakeology! Here’s one of our favorites: a shake that combines Vanilla Shakeology with strawberries, banana, and milk (or a milk alternative). Get the recipe.
Berryworks Shakeology

Watermelon and Blueberry Sparklers
Kids will love these — just make sure they don’t run with the sticks! These festive snacks are fun to make and you can toss the extra watermelon into a fruit salad of its own, like the Star Spangled one above! Get the recipe.
Watermelon and Blueberry Skewers

Wednesday, June 29, 2016

You Don’t Like to Exercise!


Why is it that people who don't need to exercise like to do it?
Why is it that people who do need to exercise don't like to do it?
Because if you're out of shape, exercise sucks!
So what do you do?

http://www.fitsolutionsblog.com/you-dont-like-to-exercise/#!155

You Don’t Like to Exercise!
You Don’t Like to Exercise, but you know it is important to live a healthy life. So what do you do? Are you that person… The one who has tried, has started, but you just never liked going to the gym. So once again you attempt to start an ambitious workout program with the goal of getting in shape, then it happens… you’re not even sure what it is that cuts you short, but it happens before you have a chance to reach your goal. You again throw your hands in the air and know You Don’t Like to Exercise.
Deep down you know what the problem is. You allow yourself to fall into the mindset of it’s hard, it’s uncomfortable, it’s sweaty, and mountains of other excuses.

So the real issue is… You Don’t Like to Exercise “right now”!

So what is the secret to having that mindset change? How do push through and stay motivated day after day when you just aren’t in that place yet? Do others that exercise with no problem know something you don’t? Nope, they don’t. It is simply that those who like working out from those who don’t are only separated by one thing: Fitness Level.
Here’s the thing. If you are not in shape working out sucks. With that said there is good news. You don’t have to become a gym rat to get to a place where exercise is no longer a pain in your A@#. With anything it does take some practice, and we all know what it was like to learn how to ride a bike. Well your fitness level will have some of those same growing pains. With time and practice, even when it may not look to pretty, exercise will help you stop feeling bad and start feeling good.

You Don’t Like to Exercise!

When you don’t like to exercise your beginning goals shouldn’t be to get buff or lose weight. The first goal should be to work toward a fitness level where it no longer sucks for you. This simply takes consistency. Having an accountability coach and group, can make that consistency much easier. Plus, with an accountability coach and group, you can stay consistent and push enough to take your fitness level in the right direction.
There’s also no reason to torture yourself at the gym when you don’t like exercise. You can have improved your fitness level and be secure right in the comfort of your own home. Why spend money on a monthly gym membership when you can improve your fitness level at home for an eighth of the cost. Just pick a program, have an accountability coach, and do it regularly with no excuses.
So here it is… Real tips to set you up for a lifetime of health with the ability to change your mind set on exercise.
1. Commit to Consistency – Choose a plan, and make a commitment to sticking to it.
2. Take Baby Steps – This is where having the right plan to follow is important. Don’t expect to turn into a fitness guru overnight.
3. Pick a Fitness Plan That Seems Fun for You – Not all exercise has to be heavy weights and a ton of burpees. Choose a program that will challenge to work your way up to a higher fitness level while being fun for you.
4. Have a Friend Join You, or Join an Accountability Group – This can make it competitive. Having a workout partner or group is one of the most effective ways to be accountable. A little competition can also be a great motivator.
5. Get into Music – Playing inspiring music while you work out can really get you going, and keep you going.
6. Use Great Supplements – We all have long days and nutrition plays an important role in how our workouts happen, and feel. Using a high quality nutrition shake during the day can really help boost your energy, and make you feel good. Of course if you are in need an extra boost after a long day at work, using clean Performance Nutritional Supplements can make all the difference.
7. Get New Workout Clothes – When starting a new program and plan, having some new workout clothes can make you feel good. Sometimes it can be the little things that help the most.
8. Reward Yourself – Doing something consistently and seeing something through is an accomplishment. So pat yourself on the back. Just remember to make your reward something that is not food related. Make it something that represents a healthy lifestyle.
You Don’t Like to Exercise now, but that will begin to change as you implement these suggestions, choose the right program and nutrition plan, and use an accountability coach and group.

Tuesday, June 28, 2016

How Often Should I Work Out to Maintain My Weight?

You put in the hours, pumping iron, logging miles, sweating buckets, overhauling your diet, and (most important) staying consistent. And the results speak for themselves — every time you look in the mirror, a leaner, more athletic person stares back at you. You’ve even bought yourself a new wardrobe. So now what?


http://www.teambeachbody.com/teambeachbodyblog/fitness/how-to-maintain-weight?referringRepId=28870

Some people will keep going, perhaps taking up triathlons, joining a hoops league, or training for the CrossFit Games. But others will want to take their foot off the gas and appreciate what they’ve accomplished. The key is not to leave it off for too long — 2 weeks of inactivity is all it takes to notice significant declines in strength and cardiovascular fitness, according to a recent study in the Journal of Rehabilitation Medicine. Indeed, the body is incredibly efficient at adapting to whatever demands (or lack thereof) are placed on it.

So now that you’ve crossed the finish line, how can you keep from backpedaling and losing what you’ve built? Just follow these simple steps.

Cut Back Gradually
Smart training plans (like those available on Beachbody On Demand) can allow you to work out 5 or 6 days a week with no ill effects (read: overtraining). But once you reach your strength and endurance goals, you can reduce your workout frequency without losing your hard earned gains, according to a study at the University of Alabama. The researchers found that adults aged 20 to 35 who worked out just one day a week not only saw no loss of muscle, but actually continued to gain it (albeit at a greatly reduced rate). Our recommendation: Start by reducing your workout frequency by a third, then a half, and so on until you find the minimal effective dose that’s right for you.

Keep It Intense
Even a single set of a strength-training exercise can produce hypertrophy (i.e., muscle growth), according to a study in the Journal of Strength and Conditioning Research. So if your goal is to hold on to what you have, one or two sets per move per workout should do the trick. The key is to keep them challenging; you should always feel like you stopped two reps short of failure. Take a similar approach with cardio. In a recent study in the journal Physiological Reports, a team of British researchers found that a single, intense, 20-minute interval workout every five days allowed participants to maintain levels of cardiovascular fitness built through much higher frequency training programs.

Dial In Your Diet
Here’s the one category where you might have to be more diligent than you were before you reached your goal. As you cut back on your workouts, you’re going to start burning fewer calories. To avoid the fate of the ex-athlete who balloons 50 pounds when he hangs up his cleats, tighten up your diet as you reduce your training time. “On the days you don’t work out, cut 300 to 500 calories from your diet,” says Dr. Jade Teta, founder of The Metabolic Effect, a fitness and nutrition coaching service focused on maximizing results with minimal effort. “Ideally, those calories should come from starchy carbs and sources of empty calories [i.e., junk food] rather than from protein or veggies,” says Teta.

Stay Flexible
These general guidelines are just that: General guidelines. Though lower frequency, more intense workouts seem to work for most people looking to maintain their fitness gains, there’s no “one-size-fits-all” solution. “It’s going to be different for everyone,” says Teta. So be a detective: Monitor your strength, weight, definition, and overall sense of well-being as you tweak your exercise and eating habits, and be ready to adjust everything up or down accordingly.

#fitness #fitnesstips

Monday, June 27, 2016

Cashew ‘N’ Oat Waffles

Tastes great!  Healthy twist!
No processed ingredients.
Quick and healthy way to start your day.

http://www.fitsolutionsblog.com/cashew-n-oat-waffles/#!155

Cashew ‘N’ Oat Waffles

We all love to have waffles and other fun breakfast food. So why not incorporate these fun breakfast foods by having a great taste but with a healthy twist. These Cashew ‘N’ Oat Waffles will pack a great nutritious punch to any breakfast without all the processed ingredients that most waffles have. This Cashew ‘N’ Oat Waffle recipe gives you the health benefits of cashews, oats, and coconut oil with great flavor.

Cashew ‘N’ Oat Waffles

(Makes 4 servings)
Total Time: 22 min.
Prep Time: 10 min.
Cooking Time: 12 min.
INGREDIENTS:
2 cups old-fashioned rolled oats
½ cup raw cashews
1 dash sea salt
1 Tbsp. coconut oil, melted
1 cup water
1 tsp. vanilla extract
1 cup mixed berries
1 Tbsp. pure maple syrup (or raw honey)
Nonstick cooking spray
DIRECTIONS:
Preheat waffle iron.
Place oats, cashews, and salt in food processor or blender; pulse until coarsely ground.
Add oil, water, and extract; pulse until well blended. Batter will be thick, but if it is as thick as paste, add 2 to 3 additional Tbsp. of water.
Pour ¼ of batter into waffle iron, lightly coated with spray; cook for about 2 to 3 minutes, or until waffle iron indicates waffle is cooked, or until waffle is cooked through. Repeat with remaining batter.
While the Cashew ‘N’ Oat Waffles are cooking, combine berries and maple syrup in a medium bowl. Slightly mash berries to release some juice.
Serve waffles topped evenly with berry mixture.

Cashew ‘N’ Oat Waffles

Nutritional Information (per serving):
Calories: 295
Total Fat: 12 g
Saturated Fat: 5 g
Cholesterol: 0 mg
Sodium: 78 mg
Carbohydrates: 40 g
Fiber: 6 g
Sugars: 8 g
Protein: 8 g

Friday, June 24, 2016

Does Sweat Indicate a Good Workout?

Did you break out in a sweat just reading that title?  If so, was it a good workout?
Do you stay cool as a cucumber in a hot yoga class?  If so, was it a bad workout?
Is sweat a good indicator?  It depends...
If not sweat, then what?  Read on...

http://www.fitsolutionsblog.com/does-sweat-indicate-a-good-workout/#!155
Does Sweat Indicate a Good Workout?

Does Sweat Indicate a Good Workout? Most people would answer Yes. So what is the answer? There is a short quick answer and then there is the longer answer that gives insight on whether or not sweat is an indicator of a good workout.

Does Sweat Indicate a Good Workout?

The Short Answer to the question Does Sweat Indicate a Good Workout is…
No! A good workout is not determined by the amount you sweat. Sweat can be an indicator of how intense your workout was, but there are much better indicators to a good workout, such as heart rate. In other words, even if you don’t sweat a ton but you bust your butt and you feel fatigued or out of breath when you are done, it was probably a good workout. Conversely, sweating buckets doesn’t mean you had a great workout. It may just mean you were really hot or worked out in a room with an elevated room temperature. Again, go by how hard you worked, not how wet your shirt is.

Does Sweat Indicate a Good Workout?

Now the long answer…
Sweating occurs to regulate body temperature. When you are too hot, your glands release a water-and-electrolyte solution across your skin’s surface to create a temperature reduction that ultimately reduces your core temperature of the body.
Our body has two kinds of sweat glands: eccrine and apocrine. Apocrine glands are located in all the nooks and crannies like your armpits and groin. Perspiration from these glands are emotionally activated. Examples are when we are nervous or stressed.
The second sweat gland, eccrine is located all over your body and these glands are the ones that do all the work when you exercise. There are approximately two to four million depending on the person.
So there can be a few reasons you may not sweat as much as another person during a workout despite similar efforts. The first reason is that two to four million glands is a wide range. You may simply have less glands. Other reasons that must be taken into account are genetics, fitness level, weight, and outside or room temperature.
Outside or Room Temperature: If the air is cool, it’s helps keep you cool, so you’ll sweat less, or if it’s extremely hot, your sweat may evaporate as fast as you generate it. Have you ever finished an event or workout to find you were completely dry, yet covered in salt? This is the residue left from evaporated perspiration.
Fitness Level: Fitness level definitely can create a decreased or increased amount of perspiration. The more fit you are the more efficient your body operates, so you will start to sweat earlier. The reason this happens is a properly cooled engine can work harder and longer, therefore the body knows to begin prepping for what it is used to doing.
Overweight people also tend to sweat more, because they have more weight to support and more mass to cool down, therefore they work harder, but they will also notice that they may sweat less as time goes on because it becomes easier to do everything.
Genetics: Some people just don’t sweat a lot regardless of how hard they workout, their weight, the room temperature etc. This is okay! The only way low sweating could be a sign of an underlying issue is if you are also becoming faint, dizzy, or not feeling well every time you do a workout. Do not confuse those symptoms with the same feelings you can get when you push yourself, because you may not be used to that kind of effort. Of course, whenever in question seek advice from your fitness and/or medical professional.
The best way to monitor your efforts is a heart rate monitor (HRM). The use of a HRM device is truly the best performance indicator for training until you get good at monitoring your efforts through perceived exertion. If it kicks your butt, you feel exhausted, you are doing what you should be doing.
Remember the answer is No to the question Does Sweat Indicate a Good Workout. Whether you are sweating or not, you must feel the burn and be spent when you finish your workout. If you’ve just started a program and are still mastering the moves you may not be quite there yet, but in time and efforts you will be seeing results with or without a lot of sweat.

Thursday, June 23, 2016

8 Yoga Moves to Strengthen Knees

"Be kind to your knees.  You'll miss them when they're gone."

http://www.teambeachbody.com/teambeachbodyblog/fitness/8-yoga-moves-to-strengthen-knees?referringRepId=28870

Yoga can be daunting for those with knee problems. Unfortunately, that’s a lot of us, myself included. Below are the yoga poses I used to strengthen my knee after surgery.

Three years into my yoga career, I suffered a meniscus tear. Physical therapy, ice, and painkillers were not enough to ward off surgery. I had to go under the knife.

My bones and tendons blocked the doctors from seeing the exact location of the tear in ultrasounds, so exploratory surgery had to be performed before the surgeon could fix the problem. By the time they were done, my leg looked like it had been beaten with a meat tenderizer and my muscles and soft tissue were in a sorry state. Giving up my career as a yoga instructor was not an option for me, so I took the time to learn how to protect my knee by strengthening the muscles that support it.
Here are the exact poses I practiced to strengthen and stretch my knees. However, make sure to always seek advice from your physician before beginning any exercise or rehabilitation regimen, especially if you have any unique or special medical conditions, such as knee problems.

5 Knee-Strengthening Poses:
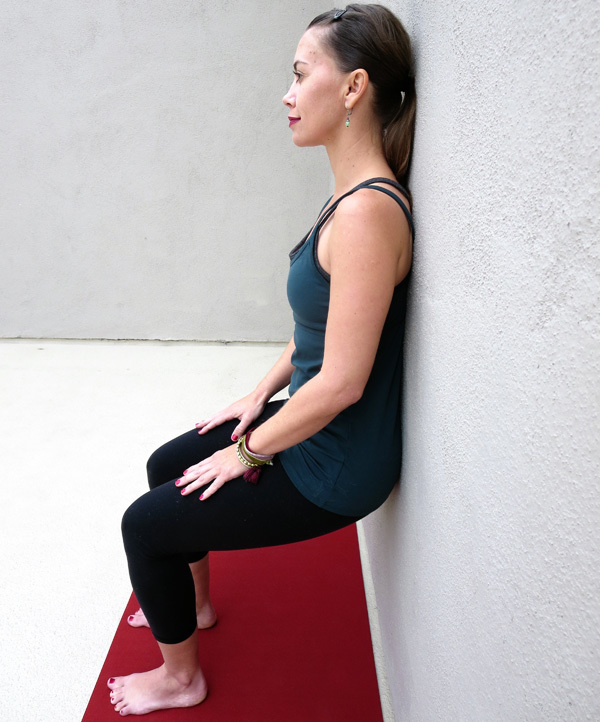
Supported Chair Pose (Utkatasana)
This pose will strengthen the quadriceps, hamstrings, and abductors. It also increases blood flow to the lower region of the body, which can help with fluidity of movement. Chair pose is typically practiced away from the wall, but that may require more strength than your knees are able to handle at the moment, so use the support of a wall if you need it. Place your feet hip distance apart. Lean your back up against a wall and slide down until your knees and ankles are parallel with each other. You can place your hands on your thighs or reach the arms towards the ceiling. Hold the pose for a few breaths then slide back up. Repeat several times. As your legs get stronger, increase the number of breaths you hold the pose.
Yoga for the Knees Chair Pose
Supported Bridge Pose (Setu Bandasana)
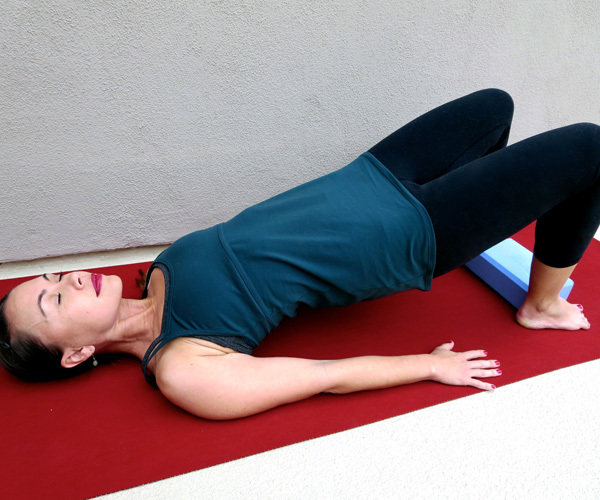
Bridge pose is a yoga asana that helps properly align your knees while strengthening your back, glutes, and hamstrings. Lie flat on your back with your knees bent and walk your feet towards your bottom until you can just touch your heels with your fingertips. Step your feet out hip distance apart and place a block horizontally on the floor between your feet. This will help keep everything in place. Press into all four corners of the feet, the inside and outside edges as well as the heel and the balls. Draw your navel in toward your spine and press your lower back into the ground. Tuck your tailbone in and lift your bottom from the ground. Lift as high as you can without compromising your form (your knees should remain hip distance apart and parallel with the ankles). To get an added stretch in the chest, you can roll your shoulders under your body and interlace your fingers underneath you. Hold this pose for a few breaths then release the upper back first, then mid back, then finally lower your lower back and tailbone to the floor. Repeat a few times.
Yoga for the Knees Bridge Pose

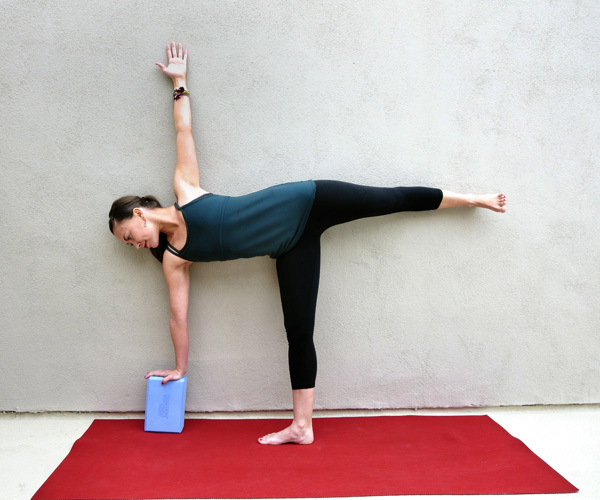
Supported Half Moon Pose (Ardha Chandrasana)
Balancing poses can be very beneficial when it comes to building the muscles that help the knee. However, if your knee is currently inflamed, you want to avoid anything that will put this much weight on the joint. By using the support of a block, you can work on strengthening the muscles in this pose and stretching the hamstrings without putting stress on your knee. The first time you do this pose, use an empty wall and a block for support. Stand with your back to the wall and rotate your right foot so that the outside edge of the foot is parallel with the wall. Place the block in your right hand, bend your right knee, and shift your weight so you’re balancing on the right leg. Set the block on the floor a few inches in front of your right foot and press your right hand into it to help straight the right arm and leg. Rotate the left side of your body upward so that your back is either in alignment with the wall behind you or leaning on it. Your left leg should be lifted and parallel with the floor. Your left arm should create a straight line with the right arm. Hold for a few breaths and increase the amount of breaths as you get stronger.
Yoga for the Knees Half Moon Pose

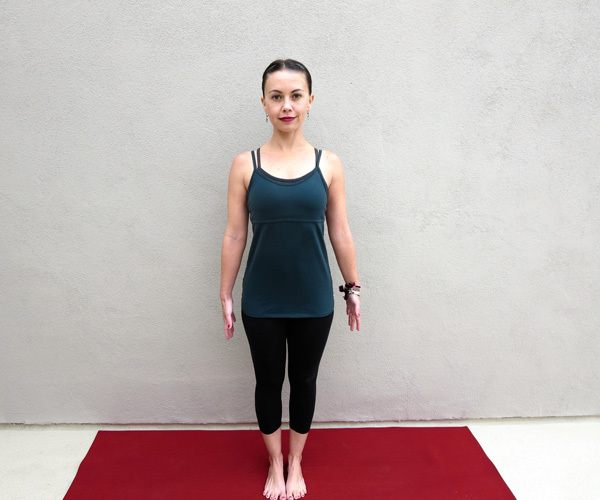
Mountain Pose (Tadasana)
Tadasana will teach you proper alignment that may help ward off new knee injuries and help you become aware of the muscles you need to engage to protect the knee. To get into the pose, stand with your feet hip distance apart, lift all your toes up, spread them wide, and then rest them back down on the floor. Press into the floor with all four corners of the feet to evenly distribute the weight of the body. As you press into your feet, engage your calf muscles. Engage the quadriceps and internally rotate your inner thighs to widen your sits bones. Tuck your tailbone in, and engage the glutes. Tighten your abs. Pull your shoulders back and down. Make sure your shoulders are stacked over your hips and ankles. Lift your chin and pull it back slightly so it is parallel with the floor. Relax the muscles in your face. Take several deep breaths and notice the muscles you have engaged to create proper posture. Hold this pose for approximately 10 breaths.
Yoga for the Knees Mountain Pose

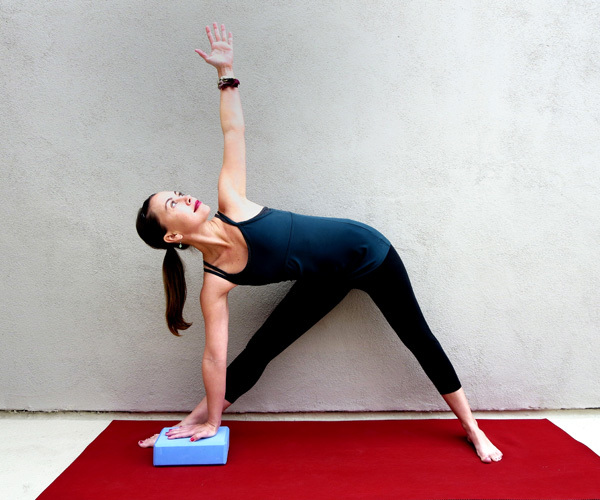
Triangle Pose (Trikonasana)
A common problem with those who suffer with knee injuries or weakness is a strong vastus lateralis (the outer part of your quadriceps) and a much weaker, underused vastus medialis (the inner part of your quadriceps). Trikonasana is a pose that will strengthen the muscles that support the inner quad. Step your feet out in a wide stance so your left foot is parallel with the back of your mat and your right foot is turned out at a 90 degree angle, parallel with the inside horizontal edge of the mat. Bend your right knee so it lines up with the ankle and hip. Press into both feet and straighten the right leg, engaging the inner part of your quad and thigh. When this muscle is engaged, you will notice it is impossible to lock your knee. However, when you disengage the muscle, it will hyperextend and lock (you should avoid this). Reach your right arm straight down and rotate upward with the left side of your body. Line up your arms so they’re in a straight line and keep your core engaged. For support, you can place your right hand on a block, but be sure to keep the core engaged as you reach up to the sky with the left side of your body. Hold for a few breaths, disengage, and then repeat.
Yoga for the Knees Triangle Pose

3 Knee Stretching Poses:
It’s important to not only strengthen the knees but also to stretch them. You can make knee injuries worse if the muscles are so tight that they decrease movement fluidity. Here are 3 poses that stretch the knees and the supporting muscles without causing pain. Again keep in mind that each person is different and very few injuries are exactly the same, so make sure to seek advice from your physician before beginning.
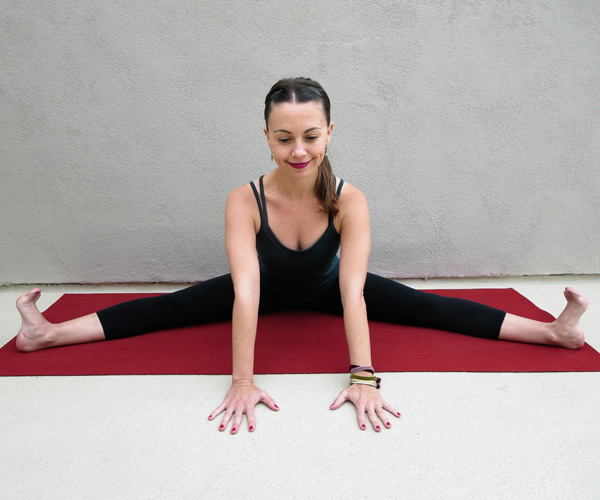
Wide-Angled Seated Forward Bend (Upavistha Konasana)
Many of the poses that stretch your legs and hips tend to torque the knee in a way that can be quite painful for those who have knee weakness and pain. Konasana is a great pose that will stretch out the whole back of the body as well as the hips, inner thighs, and groin. To get into this pose, straddle your legs out in the widest stance you can comfortably place them. Flex your feet to activate the leg muscles. Place your hands on the ground forward in front of you and slowly walk them forward until you feel the stretch. Keep your spine straight and elongated throughout the stretch. If you find that you spine creates a C shape when you start to fold, place a blanket under the sits bones to lift yourself slightly off the floor. Hold this pose for 8 to 10 breaths. Follow it up by pulling the legs together and the knees into the chest.
Yoga for the Knees Seated Wide Angle Forward Bend

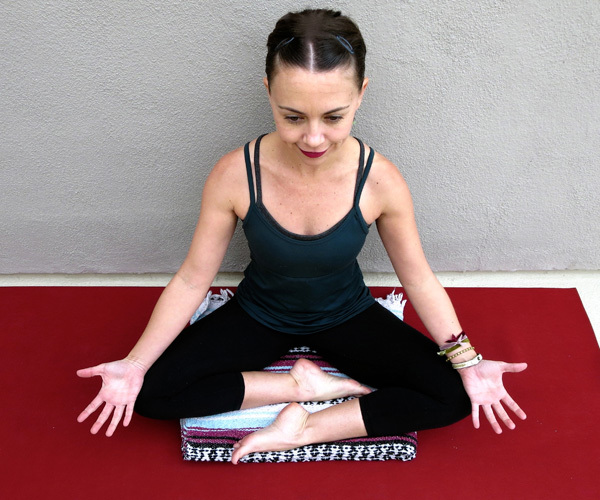
Easy Pose (Sukhasana)
Lotus is a common pose that that is held at the beginning and end of each yoga class and can be a real pain in the knee. So, instead of sitting with both feet in the crooks of your thighs, simply cross your legs and gently place one in front of the other. Keep in mind that the deeper the bend in the knee the higher the chance of pain, so you may not have a perfect crossed leg look. That’s okay. You also have the option of sitting on a blanket to make the pose more comfortable and placing blocks on either side of the knees. This pose will stretch your knees and ankles. Sit up tall and breathe deeply for about 8 to 10 breaths, increasing the amount of breaths as you feel more flexible over time.
Yoga for the Knees easy pose

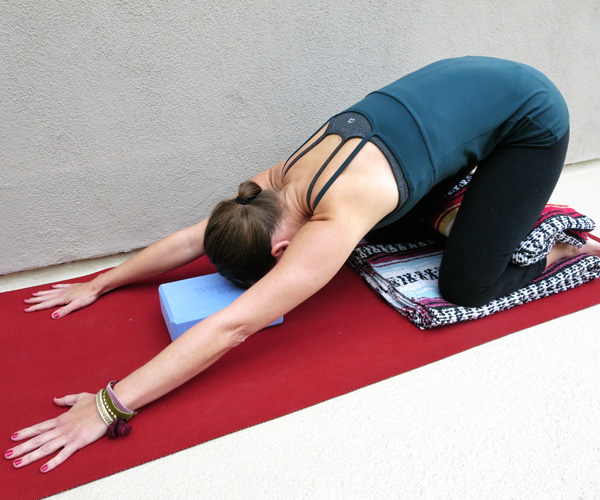
Child’s Pose (Balasana)
This is a gentle knee stretch that can be intensified the closer you can move your bottom toward your heels. Props are necessary for those with tight, sore knees. Start on your hands and knees (with a blanket under the knees for protection). In the full, unmodified, pose you’d have your feet together with your toes untucked, knees separated so the belly can rest between the thighs, bottom sitting on the heels, and forehead on the mat with the arms extended out. Modify as you need. Consider decreasing the degree to which you part your knees. Use blankets behind the knees or on the heels. This pose can be held for 8 to 10 breaths and then increased slowly as you become more flexible.
Yoga for the Knees Childs Pose